First PhoneGap App with Android using Eclipse Step by Step on Windows

Hi there! Today i'm gonna show you, how to create your first PhoneGap App with Android using Eclipse on Windows in a few minutes. While searching the web for a "Hello World Project" i found a lot of posts but no one had a good quality or was detailed enough, so anyone could understand it if starting by zero.
So i'm trying to simplify this process as much as possible and give this know how further to you all. Pre-requisite is that you have read and done all the steps from the post: How to install PhoneGap on Windows. So i'll assume you have done those steps and are ready to start. 

ATTENTION: In this post we are gonna see a PhoneGap Project (with plain javascript).
If you are looking for an Android App Project (with plain Java) so go to: First Android App Step by Step

We will learn how to:
  • download and install PhoneGap
  • create a new Android App Project
  • change the project from Java to Javascript
  • prepare the Activity-Class to work with PhoneGap
  • create a simple index.html file to run on the App
  • prepare the Manifest-file before running it
  • to run the App
  • shortcut all those steps

Download and install PhoneGap

Go to PhoneGap and download the newst version of it and unzip it in any place you want. (at the time i wrote this post it was PhoneGap 2.2.0) I recommend to unzip it in the development directory C:\development as described in the post How to install PhoneGap on Windows. You should see a structure like this bellow.


So before going ahead lets do some changes here. Select the folder phonegap-phonegap-8a3aa47 and press Ctrl+X, go into C\development and paste it here with Ctrl+V and rename it to phonegap-2.2.0 so that you have the new structure as shown bellow. After that delete the empty folder called: phonegap-phonegap-2.2.0-0-g8a3aa47.

Creating a new Android App Project

Ok, now lets create a normal Android App Project first before comming back to this new PhoneGap structure. Start Eclipse if not already running and press Ctrl+N to start the project wizard and create a new project like that: (See picture sequence bellow and don't worry about the details at this point. As soon as we get further we will understand it.)


Thats the result if everything goes fine. At this point this App is still a plain java project. We will change it now to a PhoneGap App in a few minutes. Don't worry about the App name or other properties at this point of the post. We can change everything if we want. Let's keep the focus on the really important setup things we shall know.


Changing the project from Java to Javascript PhoneGap App

First create a new folder called www and a new file called index.html. both in the project folder assets. By me it looks like this:


Ok, that's the interresting part of it. To do this, go back now to the PhoneGap structure we've unzipped in the C:\ directory and look for the android folder in it. By me it looks like C:\development\phonegap-2.2.0\lib\android and then you should see the picture bellow: (locate the points 1) 2) and 3) of it)


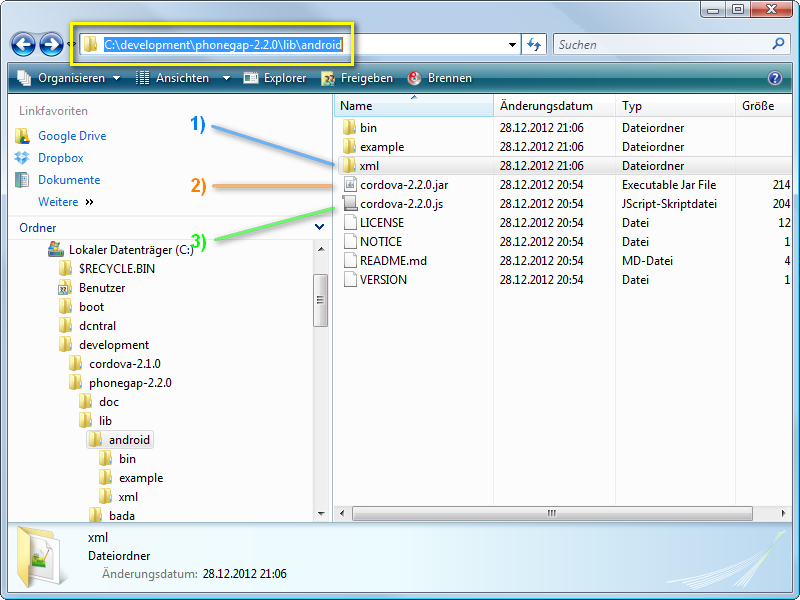
Copy now the point 1) 2) and 3) in the project structure the way you see bellow.


Prepare the Activity-Class

Ok we are almost done. Just a few changes before running it. In the eclipse locate the src-folder and open the MainActivity.java class in it and change it that way you'll see bellow: (I leave the comments so you can see what I've changed)

import org.apache.cordova.DroidGap;

import android.os.Bundle;
import android.view.Menu;

public class MainActivity extends /* Activity */DroidGap {

    // @Override
    // protected void onCreate(Bundle savedInstanceState) {
    // super.onCreate(savedInstanceState);
    // setContentView(R.layout.activity_main);
    // }

    @Override
    public void onCreate(Bundle savedInstanceState) {
        super.onCreate(savedInstanceState);
        super.loadUrl("file:///android_asset/www/index.html");
    }

    @Override
    public boolean onCreateOptionsMenu(Menu menu) {
        // Inflate the menu; this adds items to the action bar if it is present.
        getMenuInflater().inflate(R.menu.activity_main, menu);
        return true;
    }

} 

Content of Index.html

Ok now copy paste this HTML-Code into the index.html file we've created in the assets-folder.
<!DOCTYPE HTML>
<html>
  <head>
    <title>First App</title>
  <script src="cordova-2.2.0.js"></script>
  <script>
     function onLoad(){
          document.addEventListener("deviceready", onDeviceReady, true);
     }
     function onDeviceReady(){ navigator.notification.alert("PhoneGap is working!!");
     }
  </script>
  </head>
  <body onload="onLoad();">
       <h1>Welcome to PhoneGap</h1>
       <h2>Edit assets/www/index.html</h2>
  </body>
</html>

Prepare the Manifest-File before launching

In the manifest file called AndroidManifest.xml make sure you have inserted the following code in it:(Tip: in order to not do it all by hand, look at C:\development\phonegap-2.2.0\lib\android\example\AndroidManifest.xml and copy/paste it from there.)

Running the App

Select your MainActivity.java file and run it as Android application. (make sure you've an AVD installed as we have seen in the post How to install PhoneGap on Windows) If everything goes well you'll see that picture bellow. Thats all. From here you can now develop your app further.


Setup-Shortcut for the Developers under us

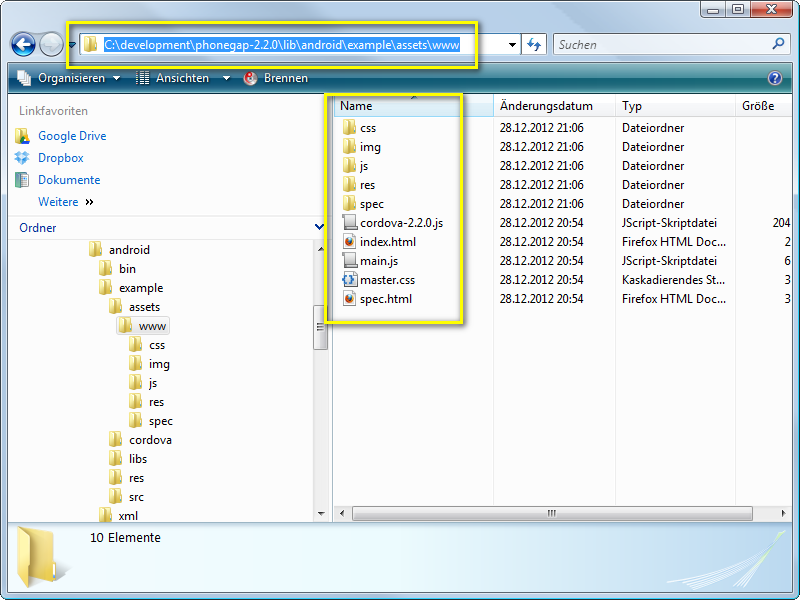
Ok there is a even better way to do this.(I've shown all steps first so we do not overwhelm us with to much stoff)  Delete the folder www in the eclipse project. Then look into PhoneGap directory C:\development\phonegap-2.2.0\lib\android\example\assets There you'll encounter a sample structure. Just copy it into assets folder like i did bellow instead of doing it by hand. It should look like this if you run it:


Another good short-cut the youtube video PhoneGap Android Tutorial.
That's all. Now let's develop some "real" PhoneGap Apps. ;-)) Have fun!

Apa Itu Phonegap? Phonegap Oh Phonegap

Apa Itu Phonegap? Phonegap Oh Phonegap tak terbayang ketika mendengar kata itu. Dalam hati "iku opo? kok aku ra reti kuper tenan" tapi santai langsung googling liat di google ketikin "apa itu phonegap" ternyata ndak keluar apa apa.... saya tunggu 5 menit tak keluar apa... ternyata belum saya enter Sial.... hahahaha.

Nah ane cari tu Apa Itu Phonegap ketemu dah di pencarian google ane cari atu per atuk... ketemu tulisan paling bagus dari blognya sleepingtux.blogspot.com nah karena blogspot ane buka dah, biasanya kalau ndak blogspot banyak ndak nyangkutnya :D.
 
Kurang lebih artikel tentang phonegap seperti ini. Easily create apps using the web technologies you know and love: HTML, CSS, and JavaScript
PhoneGap is a free and open source framework that allows you to create mobile apps using standardized web APIs for the platforms you care about.(Phonegap.com) ini copas dari website resminya.

Pernyataan diatas berarti Phonegap dapat memudahkan kita membuat suatu apps menggunakan teknologi web yang kita ketahui seperti HTML, CSS, dan Javascript. Phonegap sendri adalah suatu framework yang free dan bersifat open source dan tentunya menggunakan standar web API untuk platform yang akan dikembangkan.
Gambar di bawah ini akan lebih memperjelas apa itu phonegap . .
Phonegap

Keunggulan Phonegap lainnya dia menyediakan compile on cloud system, jadi kita bisa melakukan compiling program yang sudah kita buat menjadi Smartphone apps secara online. .
Berikut adalah daftar OS yang bisa dibuat menggunakan Phonegap:
  1. IPhone
  2. Android
  3. BlackBerry
  4. WebOS
  5. Windows Phone 7,8
  6. Symbian
  7. Bada
Selain itu phonegap juga menyediakan API untuk melakukan akses terhadap hardware device yang ada di atas. Walaupun secara performa apps yang dihasilkan oleh phonegap tidak sehalus dari native apss, tetapi phonegap bisa jadi alternatif jika kita ingin mengembangkan smartphone apps hanya menggunakan bahasa yang ada dalam teknologi web.
 
thanks mas  sleepingtux dah ane copy artikelnya :D.
 
semoga bermanfaat, 

How to install php dBase module on CentOS 6.5 PHP 5.4.x

How to install php dBase module on CentOS 6.5 PHP 5.4.x ata car install dbase di PHP 5.4.x kalli ini saya akan share pengalaman saya dalam mengistall dbase di PHP 5.4.x karena secara defauld dbase tidak di sertakan di php 5.4.x untuk itu perlu penambahan khusus atau instal manual. Pada waktu install didalamnya sudah terdapat software panel vesta CP yang saya gunakan untuk memanagement vhost atau acount aplikasi. How to install php dBase module on CentOS 6.5 PHP 5.4.x mudah tinggal jalankan perintah ini:

#gcc gcc-c++ ---> ini digunakan untuk compile agar centos bisa compile perlu diinstall


# pecl install dbase


apabila terjadi error seperti ini:

# pecl install dbase
downloading dbase-5.1.0.tgz ...
Starting to download dbase-5.1.0.tgz (14,112 bytes)
.....done: 14,112 bytes
12 source files, building
running: phpize
Can't find PHP headers in /usr/include/php
The php-devel package is required for use of this command.
ERROR: `phpize' failed 


Jangan khawatir karena itu terjadi karena tidak ada  php-devel maka dari itu perlu install php-devel dengan perintah:

#yum install php-devel
 
Ketika menjalankan itu terjadi error seperti ini:
 
Error: Package: php-devel-5.3.3-40.el6_6.x86_64 (updates)
           Requires: php(x86-64) = 5.3.3-40.el6_6
           Installed: php-5.4.32-1.el6.remi.x86_64 (@remi)
               php(x86-64) = 5.4.32-1.el6.remi
           Available: php-5.3.3-38.el6.x86_64 (base)
               php(x86-64) = 5.3.3-38.el6
           Available: php-5.3.3-40.el6_6.x86_64 (updates)
               php(x86-64) = 5.3.3-40.el6_6
 You could try using --skip-broken to work around the problem
 You could try running: rpm -Va --nofiles --nodigest
 
 
 Menandakan PHP yang terinstall versi 5.4.x sedangkan repo bawaan menggunakan php 5.3.x jika anda tambahkan --skip-broken maka php anda akan menjadi 5.3.x maka dari itu perlu repository tambahan. saya menggunakan remi dan vesta karena vesta bawaan ketika install vestaCP untuk menambahkan remi sebagai berikut:

remi

CentOS
# rpm -Uvh http://rpms.famillecollet.com/enterprise/remi-release-6.rpm 

Enable repository and Install

These repository is not supported by CentOS, so for dependancy enable them only when you want to get special package.
CentOS
# vi /etc/yum.repos.d/remi.repo
/etc/yum.repos.d/remi.repo
[remi]
name=Les RPM de remi pour Enterprise Linux 6 - $basearch
#baseurl=http://rpms.famillecollet.com/enterprise/6/remi/$basearch/
mirrorlist=http://rpms.famillecollet.com/enterprise/6/remi/mirror
enabled=0 # 1 -> 0 disable
gpgcheck=1
gpgkey=file:///etc/pki/rpm-gpg/RPM-GPG-KEY-remi

Setelah itu jalan kan perintah ini:

# yum --enablerepo=remi install php-devel

Tunggu hingga proses instalasi selesai

Setelah itu jalankan perintah ini

# pecl install dbase

Jika sukses instalasi akan muncul ini

Build process completed successfully
Installing '/usr/lib64/php/modules/dbase.so'
install ok: channel://pecl.php.net/dbase-5.1.0
configuration option "php_ini" is not set to php.ini location
You should add "extension=dbase.so" to php.ini


sekian semoga bermanfaat :) 

Pelajaran Yang Tidak Bisa Diajarkan

Pelajaran Yang Tidak Bisa Diajarkan mungkin menjadi pertanyaan bagi kita semua, pelajaran apa yang tidak bisa diajarkan. Terkadang seorang yang pintarpun tidak mampu menjelaskannya bisa jadi pengalaman yang menjadi dasar dari sebuah pelajaran yang tidak bisa diajarkan. Judur artikel itu saya dapat dari sebuah link youtube dari chanel geraidinar milik bapak Muhaimin Iqbal pemilik website www.geraidinar.com banyak inpirasi yang saya peroleh dari sana. untuk lebih jelas mengenai Pelajaran Yang Tidak Bisa Diajarkan bisa menyimak video dari bapak Muhaimin Iqbal.


source: www.youtube.com

Cara berkebun Dan Berkebun yang Baik Dan Tepat Peluang di Kebun Al-Qur'an

Berkebun mungkin bukan sebuah kata-kata yang asing di telinga kita. Ya berkebun adalah sebuah kegiatan yang mengasikkan dan menyenangkan bagi kita semua. Selain kita dapat belajar menanam, memanen dan tentu belajar bersyukur atas allah berikan kepada kita berupa tanah air dan tentu kehidupan. Berkebun mungkin bagi kebanyakan orang awam adalah menanam sayuran dan dan sayuran buha. Tapi Tidak itu saja makna berkebun yang hakiki. Apabila kita mempelajari lebih lanjut mengenai berkebun didalam Al Qur'an tentu ada potensi besar apabila berkebun yang dijelaskan didalam Al Qur'an diterapkan di Indonesia. Tentu kemakmuran akan meningkat dimana setiap rumah berkebun yang diajarkan Al Qur'an.

Kita sebagai insan yang diberi kehidupan oleh Allah terkadang lupa akan tujuan dari hidup kita. Terpedaya akan kenikmatan duniawi dan lupa akan akhirat yang nyata menjadi kehidupan yang abadi nanti. Kita sibuk akan kesibukan dunia dan kadang tak sempat mempelajari isi dai Al Qur'an yang didalamnya banyak sekali ilmu yang bermanfaat bagi manusia. Dari gambaran diatas mungkin bisa lebih jelas divideo bawah ini. Video yang berjudul Peluang di Kebun Al Qur'an ini saya dapat dari www.geraidinar.com dimana disitus tersebut banyak sekali artikel motifasi, enteprainer dan kajian berkebun yang diajarkan Al Qur'an. www.geraidinar.com adalah situs dari bapak Muhaimin Iqbal.

Sumber: youtube dan http://www.geraidinar.com

Error ORA-39142: incompatible version number 3.1 in dump file

ORA-39142: incompatible version number 3.1 in dump file

Mostly I have done database export from either same version (between production, UAT, test or development), or to a higher one in the upgrade scenario.

When doing an export from a higher version and import into a lower one:
I got an import error ORA-39142: incompatible version number when attempting to import the 11.2 export data dump file into a 11.1.0.7 database.
Import: Release 11.1.0.7.0 – 64bit Production

Connected to: Oracle Database 11g Enterprise Edition Release 11.1.0.7.0 – 64bit Production
With the Partitioning, OLAP, Data Mining and Real Application Testing options
ORA-39001: invalid argument value
ORA-39000: bad dump file specification
ORA-39142: incompatible version number 3.1 in dump file 

This error is because the database version is not compatible. I’m not sure which Oracle version you’re using but I’m on 11.1.0.7.0 and the error is due to difference in version.

You can specify VERSION option when importing data dump.
Per the help page of the expdp, here is the description of VERSION.
VERSION={COMPATIBLE | LATEST | version_string}
VERSION Version of objects to export where valid keywords are: (COMPATIBLE), LATEST, or any valid database version.

The legal values for the VERSION parameter are as follows:
COMPATIBLE – This is the default value. The version of the metadata corresponds to the database compatibility level. Database compatibility must be set to 9.2 or higher.
LATEST – The version of the metadata corresponds to the database release.
version_string – A specific database release (for example, 11.2.0). In Oracle Database 11g, this value cannot be lower than 9.2.
It is interesting that the Oracle’s document states that the VERSION can be set as low as 9.2 since the data pump only works with Oracle 10.1 or above. This is probably for backward compatibility.
Sample here is to expdp from 11.2 in order to import into 11.1
$ expdp system directory=EXPDIR dumpfile=t.dmp version=11.1.0
Sample here is to expdp from 11.2 in order to import into 10.2
$ expdp system directory=EXPDIR dumpfile=t.dmp version=10.2

Example:

Export from 11.2.0.2 database without version parameter
Export: Release 11.2.0.2.0 – Production
nohup expdp \”/ as sysdba\” schemas=TESTSCHEMA directory=DATA_PUMP_DIR dumpfile=ORCL_TESTSCHEMA_022213.dmp logfile=expdpORCL_TESTSCHEMA_022213.log job_name=expdpORCL_TESTSCHEMA_022213 PARALLEL=2 &

Import into 11.1.0.7 database
nohup impdp \”/ as sysdba\” schemas=TESTSCHEMA directory=DATA_PUMP_DIR dumpfile=ORCL_TESTSCHEMA_022213.dmp logfile=impdpORCL_TESTSCHEMA_022213.log job_name=impdpORCL_TESTSCHEMA_022213 &
Import: Release 11.1.0.7.0 – 64bit Production
Connected to: Oracle Database 11g Enterprise Edition Release 11.1.0.7.0 – 64bit Production
With the Partitioning, OLAP, Data Mining and Real Application Testing options
ORA-39001: invalid argument value
ORA-39000: bad dump file specification
ORA-39142: incompatible version number 3.1 in dump file

Now using the VERSION parameter in export dump.

Export from 11.2.0.2 database with version parameter
Export: Release 11.2.0.2.0 – Production
nohup expdp \”/ as sysdba\” schemas=TESTSCHEMA directory=DATA_PUMP_DIR dumpfile=ORCL_TESTSCHEMA_022613.dmp logfile=expdpORCL_TESTSCHEMA_022613.log job_name=expdpORCL_TESTSCHEMA_022613 PARALLEL=2 VERSION=11.1.0 &

Import into 11.1.0.7 database
nohup impdp \”/ as sysdba\” schemas=TESTSCHEMA directory=DATA_PUMP_DIR dumpfile=ORCL_TESTSCHEMA_022213.dmp logfile=impdpORCL_TESTSCHEMA_022213.log job_name=impdpORCL_TESTSCHEMA_022213 &
Successfully Imported without any errors

source: http://sunkupuli.com/2013/02/26/ora-39142-incompatible-version-number-3-1-in-dump-file/

oracle 11g – Starting and Stop the Oracle Enterprise Manager Console

1. startup db
[oracle@isc ~]$ ORACLE_SID=isc; export ORACLE_SID
[oracle@isc ~]$ sqlplus / as sysdba
SQL*Plus: Release 11.1.0.6.0 – Production on Sun Nov 9 22:52:26 2008
Copyright (c) 1982, 2007, Oracle. All rights reserved.
Connected to an idle instance.
SQL> startup;
ORACLE instance started.
Total System Global Area 1389391872 bytes
Fixed Size 1299848 bytes
Variable Size 838863480 bytes
Database Buffers 536870912 bytes
Redo Buffers 12357632 bytes
Database mounted.
Database opened.
SQL> exit
Disconnected from Oracle Database 11g Enterprise Edition Release 11.1.0.6.0 – Production
With the Partitioning, OLAP, Data Mining and Real Application Testing options

2. listener start
[oracle@isc ~]$ ORACLE_SID=isc; export ORACLE_SID
[oracle@isc ~]$ lsnrctl start
LSNRCTL for Linux: Version 11.1.0.6.0 – Production on 09-NOV-2008 22:52:00
Copyright (c) 1991, 2007, Oracle. All rights reserved.
Starting /u01/app/oracle/product/11.1.0/db_1/bin/tnslsnr: please wait…
TNSLSNR for Linux: Version 11.1.0.6.0 – Production
System parameter file is /u01/app/oracle/product/11.1.0/db_1/network/admin/listener.ora
Log messages written to /u01/app/oracle/diag/tnslsnr/isc/listener/alert/log.xml
Listening on: (DESCRIPTION=(ADDRESS=(PROTOCOL=ipc)(KEY=EXTPROC1521)))
Listening on: (DESCRIPTION=(ADDRESS=(PROTOCOL=tcp)(HOST=isc.localdomain)(PORT=1521)))
Connecting to (DESCRIPTION=(ADDRESS=(PROTOCOL=IPC)(KEY=EXTPROC1521)))
STATUS of the LISTENER
————————
Alias LISTENER
Version TNSLSNR for Linux: Version 11.1.0.6.0 – Production
Start Date 09-NOV-2008 22:52:03
Uptime 0 days 0 hr. 0 min. 0 sec
Trace Level off
Security ON: Local OS Authentication
SNMP OFF
Listener Parameter File /u01/app/oracle/product/11.1.0/db_1/network/admin/listener.ora
Listener Log File /u01/app/oracle/diag/tnslsnr/isc/listener/alert/log.xml
Listening Endpoints Summary…
(DESCRIPTION=(ADDRESS=(PROTOCOL=ipc)(KEY=EXTPROC1521)))
(DESCRIPTION=(ADDRESS=(PROTOCOL=tcp)(HOST=isc.localdomain)(PORT=1521)))
The listener supports no services
The command completed successfully

3. Oracle Enterprise Manager start
[oracle@isc ~]$ ORACLE_SID=isc; export ORACLE_SID
[oracle@isc ~]$ emctl start dbconsole
Oracle Enterprise Manager 11g Database Control Release 11.1.0.6.0
Copyright (c) 1996, 2007 Oracle Corporation. All rights reserved.
https://isc.localdomain:1158/em/console/aboutApplication
Starting Oracle Enterprise Manager 11g Database Control ………… started.
——————————————————————
Logs are generated in directory /u01/app/oracle/product/11.1.0/db_1/isc.localdomain_isc/sysman/log

4. Test
browser : https://isc.localdomain:1158/em/
isc.localdomain : 172.20.141.78
em01

em02
source : http://setijoagus.wordpress.com/2008/11/07/oracle-11g-starting-the-oracle-enterprise-manager-console/